Table of Contents
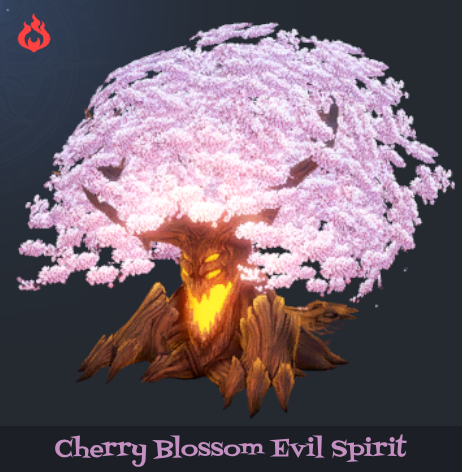
Love is in the air, and so is the spirit of the Hunt! This Fiend is a formidable foe that shreds the magic resist of your entire team, before unleashing its magic attacks. Taunting the Fiend and sacrificing our units is key to getting its guard down.
Prepare accordingly so that when the Hunt starts on the 20th of March (UTC), you'll be prepared to vanquish this evil spirit.

Key Points
- Fiend Stats: 0 DEF & MRES, 200 CDMG, 100 Fire DMG, 50 Wind RES.
- S3 gives the Fiend 100 crit rate if you do not dispel it after S2, tripling its damage. So be sure to bring a dispeller!
- Diana takes double damage from this Fiend, so make sure that she is well geared.
- 15 Initial SP, 2 SP gained per turn.
- SP is a bit tight, so make use of battery skills such as from Helena and Teresse!
- The Fiend shreds your entire team for 90 MRES, making your MRES gear useless. So, build HP Gear for this Hunt.
- Alternatively, you can allow your first team to take this shred, then immediately swap to your second team, allowing that team to build MRES Gear.
- Bring a unit who can provoke, in order to trigger C1. Have this unit die to C1 in order to trigger C2 right after.
- We will be needing quite a bit of defensive utility for this Hunt. Bringing a combination of heals, energy guards, and damage reduction will help a ton. Also, debuff the Fiend with Celia's MATK down!

Skill Rundown
S1 — Frenzied Thorn

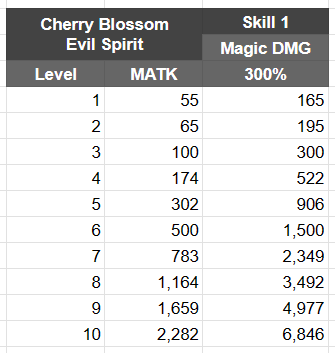
The Fiend shreds your entire team for 90 MRES. This means that for the rest of the battle, all you have is your HP values. This is why you should just build HP gear, then use defensive utility to stay alive.
Of course, from level 5 onwards, you can instead sacrifice your first team to this shred, then swap to your second team afterwards. This is not ideal if you're pushing for ranks, but if you only care about the level 10 clear, consider doing this and giving your main team MRES gear.
The third strategy is to simply not care about this shred, since you can just trigger C1 and then C2 immediately, frontloading your damage output. This strategy is really only ideal for those who want to get the battle over with.
S2 — Pressure of Love


The Fiend gives itself an 100% MATK buff, which you have to dispel right after, or you'll most likely die to S3, as explained below.
S3 — Heart's Compulsion


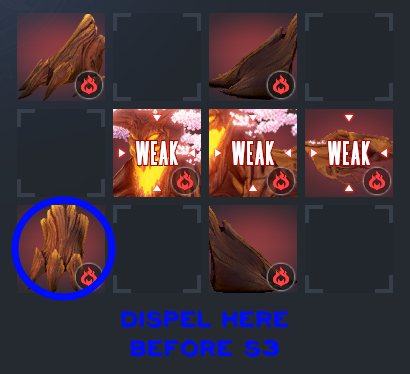
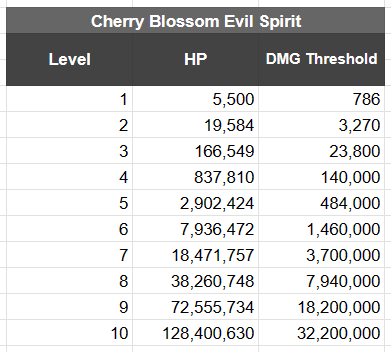
As stated earlier, you must dispel the Fiend before this skill, or you'll be facing a world of hurt. If you don't, the Fiend will have a guaranteed crit on almost the entire field, tripling its damage. Add the MATK buff it already had, and now it's dealing 6 times the damage listed in the chart.
You can't just use the conditional skills to let the MATK buff run out, since that just means more damage on your DPS units.
S4 — Cherry Blossom's Passion
A team wipe! Your next team then takes the stage as the Fiend loops back to S1 and resets its conditional skills.
C1— Surging Sincerity


Front

Trigger: Use any taunt skill.
Position your DPS units on the same lane as your taunting unit, so that they can receive the 200% M/ATK buff. Also make sure that your taunting unit is squishy enough to die to this attack, in order to trigger C2 the following turn. If you're unable to do that, then you can have your buffer die to this attack, provided that they used their buff right before this turn.
C2 — Desperate Confession

Trigger: There are 4 or fewer allies on the field.
Since your taunt unit won't be contributing significant damage, it's ideal that they are the one to die to C1 in order to trigger C2 (or your buffer after they've used their buff skill).
Have either your buffer or taunt unit (whoever didn't die to C1) take the kill effect of C2.
Hunting the Fiend
The turns after C1 and C2 are your nuke turns, so you can use either of the following skill sequences:
- C1 → C2 → S1 → S2 → S3 → S4
- Triggering C1 and C2 at the beginning of the fight means that you can ignore the Fiend's survivability checks and go straight into the nuke turns, but since you end up sacrificing your buffer early on, you will lose out on damage after the nuke turns (assuming you can survive).
- Consider using this sequence if you only want the level 10 clear and you're confident in your damage output during the nuke turns. Also consider using this on your second team if you can't run a dispel unit there.
- S1 → S2 → S3 → C1 → C2 → S4
- This sequence maximizes your damage output, since you will have your buff up the entire fight. This however means weathering the many attacks the Fiend does. If you're pushing for ranks (or if you need to squeeze out a bit more damage), this is most likely the sequence you will be using.
Team Building
Example Composition:


Schera (DPS) — Likely the ideal DPS, even without her potentials, since she's the only water DPS with a dispel for S3, and her patterns line up well against the fiend. Alternatives would be Rafina, whose costumes line up decently fine, and Sylvia, who doesn't get that much mileage since this Fiend does not do any crazy multihits.
Diana — Just doing Diana things, and if you have her Anti-Dystopia costume, she helps mitigate a ton of damage! Her potentials aren't too impactful for this Fiend Hunt, unless you're really trying to min max your damage.
Teresse (Buffer) — With her new buffing costume bringing a higher damage ceiling for magic teams, and her healing making sure that your units stay alive, she's really good for this Fiend Hunt. Teresse's base costume also generates a bit of SP here and there. Helena's a decent alternative since she also provides damage reduction buffs, and Lathel is a worse (but cheaper) alternative for physical teams since he has no healing in his kit.
Celia — She does tons of chains, triggering Fiend Hunt's new guaranteed crit gimmick, and she also debuffs the Fiend's MATK, helping you survive those nasty hits. Upgrading Descendant Celia's CD potential might help since it gives her 100% uptime on the debuff, but I don't think that should be necessary.
Andrew (Taunt) — He has the cheapest taunt besides Glacia +3, and since evade doesn't work in Fiend Hunt, he'll pretty much die to C1. Glacia works fine too as an alternative, since you can sacrifice the buffer to C1 and her to C2 instead. Lecliss is a bit too expensive SP wise, and Seir isn't worth the tear to get a taunt.
Closing Remarks
Big fan of this Fiend's design, since it doesn't fall into the pitfall of having to be balanced around 90 MRES. The downside is that whether you survive this Fiend depends on the dupes you have on your defensive utility costumes. Celia's MATK down and Helena's damage reduction for example are pretty dupe reliant.
Seriously though, what's up with Schera and Rafina not getting potentials yet? Are they saving them for the second half of the season?